Index Template

Non-Repudiation & The Joy of Knowing You’ve Been Hacked

500995147_5f56493a1e_b

Non-repudiation in IT security means being able to prove where something comes from or who did what. Although few people talk about it, it’s actually an essential part of a lot of technologies we use daily. For example, Apple makes all developers sign their applications before submitting them to the iOS store. That makes it possible for Apple to trace the origin of an App directly to a developer.

Which brings us to shared accounts. Having worked with hundreds of companies over the past couple of years, we’ve learned that shared accounts are ubiquitous, specially for infrastructure accounts (if your company uses SSH, chances are you have one Unix Login that all your admins/employees share). Which makes non-repudiation harder.

Yet you can still achieve non-repudiation if each employee uses a different SSH key on the authorized_keys. That way you can trace every action to a specific key. But now comes the hard part. What if you want add Two-Factor Authentication to this account?

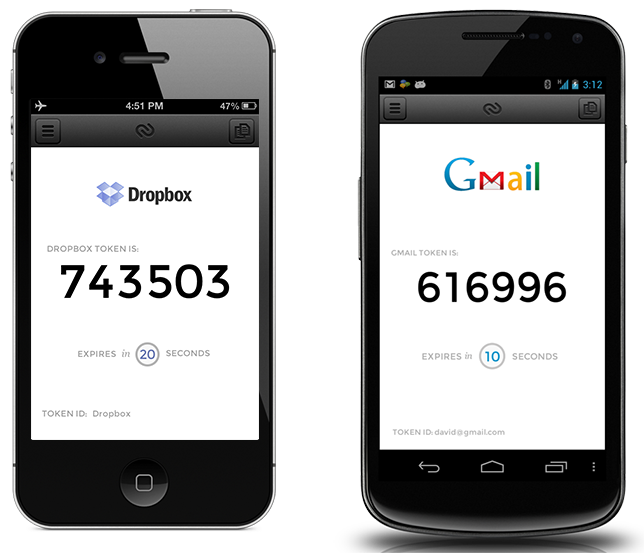
The problem is essentially: you have one unix login (Eg: admin) that is shared by multiple employees and you want to add Two-Factor Authentication to this account. What can you do? The simple solution is to share a Two-Factor Authentication key among all employees. If you are familiar with Google Authenticator, you know it’s possible to embed the key on a QR-Code (or manually typed in). So one employee generates the key and then shares it with everyone else. He also keeps a stored copy of the key, so when a new employee starts, they also can get the key. The result is, you end up with one login and one Two-Factor Authentication key.

The fact that they store the QR-Code is bad by itself (securely storing secret keys is very hard and we’ve even seen companies which store it unencrypted on a shared Dropbox). But worse is that you are giving away non-repudiation and when (not if) you’re hacked you won’t know where it came from.

Let me explain. Obviously, you’ll know the QR-Code with the key was compromised, but the problem is you won’t know how. Was it Andrew’s android phone which was compromised? Or maybe it was Joe’s iPhone? Maybe it was the Dropbox account where the QRCode is stored?

So what do you do next? Do you perform a forensic analysis on every employees cellphone? Or do you simply generate a new key and share it with everyone again? But how can you be sure you are not sharing it with the hacker too? Because realistically, you probably are.

Look, getting hacked sucks, but staying hacked sucks even more. There’s nothing worse than continuously being monitored by a hacker who’s staying undetected for years and you don’t even know. Long gone are the great days when attackers would deface or bring down your site the minute they gained access. Today you’re lucky if the hacker even writes anything to disk.

But if you are one of the lucky few that discovers you were hacked, you want to at least make sure you can trace back where the attack came from, learn from it and shut it off. And that’s why non-repudiation is so important. That’s why, when one of our clients asks us to give them the Authy secret key we refuse (and we’ll continue to do so). That’s why you can’t type or see the secret key for an Authy account. And that’s why Authy enforces that each key is only available on one phone ever. Sure, it might make things a bit harder, but it enforces the right principles.

So next you are building or using a system, insist on non-repudiation. Make sure you are able to trace every action to a specific person. Never, ever give up non-repudiation for simplicity.

And if you happen to be sharing unix accounts and want to add Two-Factor Authentication the right way, you might want to give our latest SSH plugin a try.

How To Protect Your WordPress From Brute-force Attacks

maxresdefaultLast week a large distributed brute-force attack was launched against WordPress Blogs. One of the first to notice the attack was Cloudflare. Not only did they detect the attack, they automatically protected your WordPress site if you had an account with them.

On this blog post, we want to give you some details of the attack, what to do if you were compromised and things you can do going forward to protect your site from future attacks.

The attack

The attack is simple. Because WordPress by default does not limit the number of logins attempts a person can try, the attackers created a bot that identified WordPress sites and tried to brute-force the login using common username/password combinations.

A total of 2927 common username/passwords were tried. All of them are simple usernames and password. Here’s a sample of 10 combinations used in the attack:


Admin:passwd
Admin:parol
Admin:pass
admin:admins
admin:administrator
admin:administrators
admin:Admin
jessica:JMR9760
jessica:JMR9760
jessica:JMR976
admin:qwerty

Although the list is short (<3000) it looks like it was highly effective. HostGator reported up to 90,000 IP’s are participating in the attack.

The reality is that passwords are simply not enough these days.

How to protect yourself

There are 3 simple things you can do to protect your WordPress site.

  1. Rate limit the amount of logins using this WordPress plugin.
    http:/wordpress.org/extend/plugins/limit-login-attempts/
    
  2. Avoid using common login names such as admin, Admin, root, Administrator.
  3. Don’t use common words for passwords. Make sure you choose a strong password.

These are simple steps you can ensure your WordPress site is a little safer. However if you have a larger WordPress site with multiple users, it’s hard to make sure everyone is following this practices. If you are serious about security you shouldn’t be using username and passwords only.

We recommend:

  1. Sign-up for a free Cloudflare account. They will not only protect you from these types of attacks but from many others.
  2. Enable Two-Factor Authentication on your WordPress blog. Have a look at Authy for WordPress. Don’t be intimidated if you are not tech savvy, we designed the Authy for WordPress plugin to be used by anyone. Just follow the installation video and you’ll be fine.

What if you are already compromised?

There are a few steps you should take:

  1. Login as admin and remove all users from your WordPress site that you don’t recognize.
  2. Change all of your passwords (for all users).
  3. Re-install your WordPress site from scratch.
  4. Change your database password. Look at wp-config.php. Make sure you change your database password and any other passwords inside that file.

Staying Safe

As attackers and attacks evolve, keeping your WordPress site secure becomes harder and harder. We know trying to remember complicated passwords is hard and enforcing it on others is even harder. But there’s no reason these days that you should be using a username and passwords only. If you enable Two-Factor Authentication and keep your WordPress site up-to date you’re already 99% ahead of the attackers.

Security Notice: WordPress Plugin Vulnerability Resolution

badge-conscious-shareLast week we released a WordPress Plugin for Authy. A few hours after the launch we were informed by Jon Oberheide from Duo Security that our WordPress plugin contained a vulnerability. Within 10 minutes we were able to confirm the vulnerability and evaluated the security impact. Our determination was that the vulnerability was not critical and we decided not to pull off the plugin from WordPress.

We also immediately started working on fixing the issue. Four hours later after doing all quality checks, we released a new version which patched the vulnerability.

We are committed to being a very transparent company, so we want a detail here what the vulnerability was. We’re also working on creating a new webpage that will detail how we handle security vulnerabilities at Authy and how to contact us in case you find one. We’ll publish this on our website and our blog in the next few days.

Details

The Authy WordPress Plugin uses 2 different web-pages to authenticate users that enable 2-factor authentication. On the first page user enters his username/password and on the second he enters his Authy Token.

Because of how WordPress Authentication works, we had to re-use the same end-point for both POST request (username/password and token). Jon found that it was possible to bypass the password check if you sent a valid Two-Factor token to the authentication endpoint manipulating the first request. This meant that the Two-Factor Authentication was reduced to one factor, in this case, a valid Authy Token.

Because the attacker still needs a valid Authy Token it means the impact was fairly low. Authy tokens are generated using RFC 6238 with a 256 Bit Key (HMAC-SHA256), can only be used once and are time sensitive. That makes generating a valid Token is virtually impossible without having access to the secret key. For instance, Authy.com has used single factor authentication using Authy Tokens for over a year now.

Essentially the Authy Token is a much more secure than a password and you are much more secure if you are using a Token instead of a password.

So if you installed the plugin you were still better protected than you were initially with just a password. That said, we’ve already released a new version to fix the issue and most people installed the new version, if you still have the old version consider updating now.

Fix

We looked at several alternatives, including checking the token and the password on the same screen. Ultimately, we decided it was best to keep separate web-pages for the token. In order to make this work securely, during the logon process when WordPress verifies your password, we generate a long random string that we return back to the browser if the password is correct. This random string is only valid once for the next 5 minutes. So when you enter your token, your browser transparently also sends back this random string. We then verify both the token and the random string are correct. Since only the person who knows the password will be able to get the the random string in the first place, we know by the time we verify your token that you know the password, without ever exposing your password back through the network.

We’ve also released the full source code of the plugin if you want to check it yourself: Source Code

Thanks

We want to thank Jon Oberheide from Duo Security for informing us responsibly about the vulnerability and handling the whole issue very professionally.

Protect WordPress Sites in Under 2 Minutes

2minuterule_big

WordPress has made it easy for anyone to create and maintain a great site. It’s so powerful that even some of the biggest site’s on the web like forbes.com use it.

Last year we saw millions of passwords stolen when large sites like LinkedIn and Gamigo were compromised. Then we read through the gripping story of WIRED reporter Mat Honan telling us how his life got turned upside down when his accounts got compromised. We saw how suddenly the media and everyone started talking about two-factor authentication. How now, more than ever, it is important to protect yourself with more than just a password. But the truth is: that’s easier SAID than DONE. We want to change that TODAY.

Today we’re releasing a WordPress plugin that’s specifically designed to help anyone, technical or not, to protect their WordPress site with Two-Factor Authentication in under 2 minutes.

Two-Factor Authentication is a strong form of Authentication were the person is required to know something, like a password, and have something, like a Smart-card. With Authy, the person is required to know his password as well as a Token. The Token is a 7 digits number that changes every 20 seconds and is tied to a physical object you already have: your phone. So even if an attacker was able to get your password, he has no way of knowing your Token since he doesn’t have your phone. Also because the Token is changing constantly (every 20 seconds) and can only be used once, phishing attacks and key-loggers are ineffective. Even if an attacker was able to get the Token using a key-logger or a phishing attack, the token would be already used or expired.

  • You can get your free API key from Authy here
  • Download the plugin from: WordPress

To make sure anyone can benefit from this, we made a video that explains how to install and configure Two-Factor Authentication today on your WordPress site in less than 2 minutes.

One Token To Rule Them All

Since we launched Authy one of the most common concerns is that no one wants to install a new app for every Two-Factor Authentication account. We built Authy to be the best Two-Factor Authentication system ever created, so naturally we had to solve that problem. Today we are happy to announce you can now add all your Google Authenticator Tokens into Authy.


We’ve made a number of improvements over the Google Authenticator App.

  1. Accounts backups: If you choose to, Authy will encrypt (inside your phone) your Google Authenticator accounts and we will securely store them on our servers. Note that we only store the encrypted version. Neither Authy nor its employees will have access to your accounts. We recommend you choose an encryption key of 8 or more characters.
  2. Automatic account detection: We’ll automatically detect if it’s a gmail account, dropbox account or any other account automatically for you. Depending on that we’ll use different graphics and other enhancements.
  3. You always get 20 seconds to enter your token. Everytime you open the app, we’ll open your last used token and you will have 20 seconds.
  4. We’ll automatically check your time.  And if it’s out of sync, we’ll let you know. Future versions will automatically sync the time for you, just as we do on all Authy tokens.

Here’s a small video showing how to add Authenticator accounts.

New Website, Plans & Blog

We just updated our website, our pricing and our blog.

First we cleaned up our index page and our demo to make them easier to understand/navigate. But perhaps the biggest change is our new plans and pricing.

We’re committed to build a long-term, self-sustainable company which provides the best two-factor authentication you’ve ever seen. In order to achieve this, we’ve monitored usage/costs over the last few months and it was clear we we had to make some changes to our current pricing. For those of you who already sign-up to one of the previous plans, you can keep it as long as you want or you can change to any of our new plans – your choice -.

Next, we decided to simplify our blog. We were using WordPress, and although it’s very powerful and probably the most popular blogging engine, we came to the conclusion it was just not for us. After looking for an alternative, we decided to write our own and then open-source it. Blossome (Blog + awesome) is a simple Blog engine for hackers. We’ll be talking more about Blossome soon, we still want to fix a few issues before making it more available.

We hope you like our new website and plans.


Add 2FA To Your SSH In 30 Seconds

We love SSH here at Authy. We use it for practically everything: git, remote shell’s access, deployment scripts and even pair programming.

Installation.


$ curl 'https://raw.github.com/authy/authy-ssh/master/authy-ssh' -o authy-ssh
$ sudo bash authy-ssh install /usr/local/bin
$ sudo /usr/local/bin/authy-ssh enable `whoami` <your-email> <your-country-code> <your-cellphone>
$ authy-ssh test
$ sudo service ssh restart

Keeping it secure yet accessible for everyone turned out to be quite a challenge. At first we used X.509 certificates on authorized_keys and we instructed everyone to protect their private certificates with a password. However using multiple certificates each with a different password quickly became unmanageable. Reluctantly we resorted to a single certificate per user with a password. However, this is far from ideal. If employee machine got hacked, the hacker could steal his certificate and easily use a keylogger to steal the password. And with the password and certificate in hand, he would have access to virtually everything (including our source code through git-ssh).

We looked for other possibilities, but they all looked like a lot of work.

Finally we decided to reuse our API to add two-factor authentication to all of the machines. We hacked a quick bash script to connect to our API and used the SSH ForceCommand directive to run this script before each login. The script verifies the user token and if correct initiates the session. This meant that we could use multiple certificates again, but without requiring everyone to protect them with passwords. Best of all, if anyone stole a certificate they still wouldn’t be able to access any of the machines, as they would still require the One-Time-Password generated by the Authy App.

We knew we couldn’t be the only one who wanted this, so we made a new version that everyone can install in less than 30 seconds. Let us know if you find it as useful as we do. The whole source code is on Github: https://github.com/authy/authy-ssh. Feel free to fork it and modify it as you wish. We wrote it in bash because we hate compiling things and this meant it would run everywhere without special voodoo.

Also in the next few weeks we’ll be releasing our chef recipes we use internally, as well as some tips on how to scale this, so you can add it to 1 or 1 million machines. If you can’t wait, it should be quite easy to quickly hack this version to fit your company needs. As always, simply e-mail us at [email protected].

By the way, we made a short video so you can see Authy in action. Enjoy.

Two-Factor Auth For Everyone

bigstock-Binary-code-background-59902745-650x251More than a year ago Daniel Palachio started working on an Android App to add two-factor authentication to a site he was working on. Since then, Authy has changed dramatically to become a full platform that anyone can use to simply add two-factor authentication to their site or app.

We built Authy for ourselves. We wanted a two-factor authentication solution that would work across sites since we didn’t want to install and configure a new App for every site, that was simple to integrate and finally, that would be self-serviced, so we didn’t need an IT department. Once we had the basics done, we decided to open the API to a few of our friends and they loved it.

This year things changed.

We’ve witnessed how Linked-in, Last-FM, Linode and, just this week, Dropbox were hacked. Taking the lead, Dropbox has now decided to enable two-factor authentication. Why haven’t others? Well, it’s still very hard for the average site to do so. We wanted to change that, so we decided to open our API to everyone.

If you own a site or app and you care about your users, consider adding two-factor today. Do not wait until your users get hacked, that’s just irresponsible. And if you are a user, demand two-factor authentication from the services you use. It’s in your hand’s to decide on whether you want to keep things the way they are….or have a future where your data is safe.

Follow-us on twitter: @authy


Powered by Twilio

Toggle

Authy Powered by Twilio

Build 2FA into your applications with Twilio APIs.

Learn more

Learn more about 2FA API
Access the Dashboard

We can text you a link to get started:

Close